Hello, learner today In this blog post, We will be creating a Pixel Art Generator using HTML, CSS, and JS. In the past post, we have created many projects one of them is the Download Button Animation. Without wasting time Now it is time to create a Pixel Art Generator.
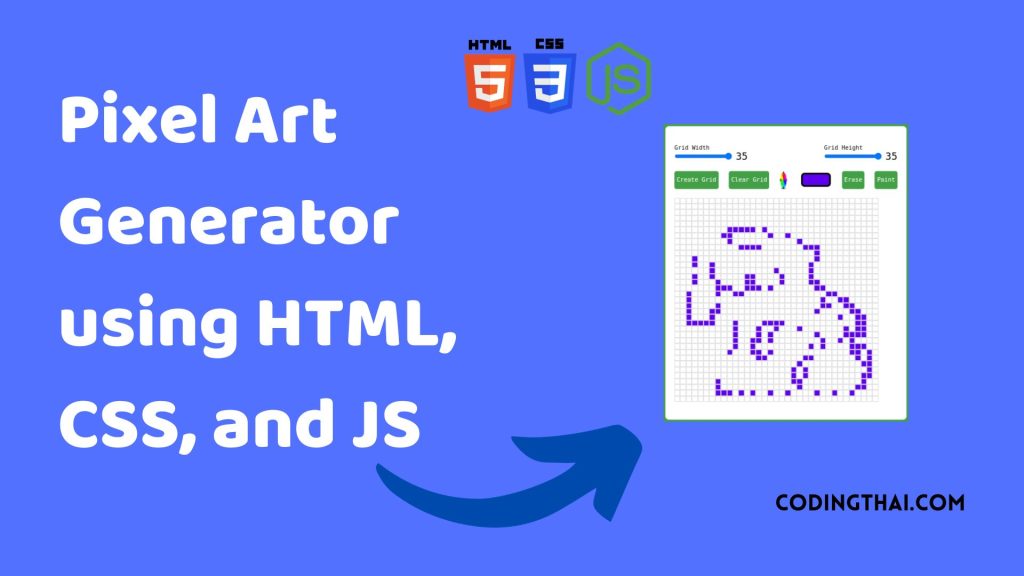
This Pixel Art generator is created by using HTML, CSS, and Javascript. As you can see on the Avobe image of this Pixel Art Generator. There are small pixels in the Grid box. There are different buttons like Create Grid this button creates a new grid with the given width and height.
Similarly, there is another button called clear Grid this button clears the given pixel grid. Again there are two other buttons Erase and print. Erase the button to remove the written pixel from the grid and print the button to print the grid you created.
| Code By | Coding thai |
| Language Used | HTML, CSS and JS |
| Responsive | Yes |
| External Link / Dependencies | No |
There are 3 types of styles to connect CSS with HTML files. Inline CSS, Internal CSS, External CSS. For Inline CSS in this, we have to write the CSS code inside the HTML code using style Attribute elements. For internal CSS we have to use the Style tag in the Head section on HTML File. We have used this Internal CSS in The below section. Last is External CSS for this we have to create another CSS File in the same folder this
Preview of Pixel Art Generator
In this preview, we have used internal CSS in the code. In the internal CSS, we have to write the code in the head section using the Style tag. We have to write the code in <Style> CSS code </style> in the Head section in the HTML file. This code is run in Codepen.io
See the Pen ixel Art Generator | Codingthai by Coding thai (@Codingthai) on CodePen.
You might like this
- Glassmorph Calculator using HTML, CSS, and JS
- Glassmorphism loader Animation using HTML and CSS
- Animated Skills Bar using HTML and CSS
- Glowing Login Form using HTML and CSS
- Sneakers Product Card using HTML and CSS
Pixel Art Generator using HTML, CSS, and JS [Source code]
For Creating A Pixel Art Generator using HTML, CSS, and JS. First, you have to create Three files (HTML, CSS, and JS) files with the named index.html, style.css, and Script.js in the same folder and you have to link the CSS and JS files to HTML. after that paste the below code, the HTML code in index.html, and paste the CSS code in style.css Again paste the Js code in script.js that’s all after pasting the code.
First, you have to create an HTML file with the named index.html paste the below HTML code on it, and save it. Remember to give a .html extension to the HTML file.
<!DOCTYPE html>
<html lang="en">
<head>
    <meta charset="UTF-8">
    <meta http-equiv="X-UA-Compatible" content="IE=edge">
    <meta name="viewport" content="width=device-width, initial-scale=1.0">
    <link rel="stylesheet" href="style.css">
    <title>Pixel Art Generator | Codingthai</title>
</head>
<body>
    <div class="wrapper">
        <div class="options">
            <div class="opt-wrapper">
                <div class="slider">
                    <label for="width-range">Grid Width</label>
                    <input type="range" id="width-range" min="1" max="35">
                    <span id="width-value">00</span>
                </div>
                <div class="slider">
                    <label for="height-range">Grid Height</label>
                    <input type="range" id="height-range" min="1" max="35">
                    <span id="height-value">00</span>
                </div>
            </div>
            <div class="opt-wrapper">
                <button id="submit-grid">Create Grid</button>
                <button id="clear-grid">Clear Grid</button>
                <input type="color" id="color-input">
                <button id="erase-btn">Erase</button>
                <button id="paint-btn">Paint</button>
            </div>
        </div>
        <div class="container"></div>
    </div>
    <script src="index.js"></script>
</body>
</html>
After pasting the HTML code, Now have to create a second CSS file with the named style.css. Paste the below code on it and save it. Again remember to give a .css extension to the CSS file.
*{
    padding: 0;
    margin: 0;
    box-sizing: border-box;
    font-family: monospace;
}
body{
    background-color: #A020F0;
}
.wrapper{
    background-color: #fff;
    width: 80vmin;
    position: absolute;
    transform: translate(-50%, -50%);
    top: 50%;
    left: 50%;
    padding: 40px 20px;
    border-radius: 8px;
}
label{
    display: block;
}
span{
    position: relative;
    font-size: 22px;
    bottom: -1px;
}
.opt-wrapper{
    display: flex;
    justify-content: space-between;
    margin-bottom: 20px;
    gap: 10px;
}
button{
    background-color: #43a047;
    border: none;
    border-radius: 5px;
    padding: 5px;
    color: #fff;
}
input[type="color"]{
    -webkit-appearance: none;
    -moz-appearance: none;
    appearance: none;
    background-color: transparent;
    width: 70px;
    height: 40px;
    border: none;
    cursor: pointer;
}
input[type="color"]::-webkit-color-swatch{
    border-radius: 8px;
    border: 4px solid #000;
}
input[type="color"]::-moz-color-swatch{
    border-radius: 8px;
    border: 4px solid #000;
}
.gridCol{
    height: 1em;
    width: 1em;
    border: 1px solid #ddd;
}
.gridRow{
    display: flex;
}
@media only screen and (max-width: 768px){
    .gridCol{
        height: 0.8em;
        width: 0.8em;
    }
}
After pasting the HTML and CSS code, Now have to create a third Javascript file with the named script.js. Paste the below code on it and save it. Again remember to give a .js extension to the javascript file.
let container = document.querySelector(".container");
let gridButton = document.getElementById("submit-grid");
let clearGridButton = document.getElementById("clear-grid");
let gridWidth = document.getElementById("width-range");
let gridHeight = document.getElementById("height-range");
let colorButton = document.getElementById("color-input");
let eraseBtn = document.getElementById("erase-btn");
let paintBtn = document.getElementById("paint-btn");
let widthValue = document.getElementById("width-value");
let heightValue = document.getElementById("height-value");
let events = {
    mouse: {
        down: "mousedown",
        move: "mousemove",
        up: "mouseup"
    },
    touch: {
        down: "touchstart",
        mobe: "touchmove",
        up: "touchend",
    },
};
let deviceType = "";
let draw = false;
let erase = false;
const isTouchDevice = () => {
    try {
        document.createEvent("TouchEvent");
        deviceType = "touch";
        return true;
    } catch (e) {
        deviceType = "mouse";
        return false;
    }
};
isTouchDevice();
gridButton.addEventListener("click", () => {
    container.innerHTML = "";
    let count = 0;
    for (let i = 0; i < gridHeight.value; i++) {
        count += 2;
        let div = document.createElement("div");
        div.classList.add("gridRow");
        for (let j = 0; j < gridWidth.value; j++) {
            count += 2;
            let col = document.createElement("div");
            col.classList.add("gridCol");
            col.setAttribute("id", `gridCol${count}`);
            col.addEventListener(events[deviceType].down, () => {
                draw = true;
                if (erase) {
                    col.style.backgroundColor = "transparent";
                } else {
                    col.style.backgroundColor = colorButton.value;
                }
            });
            col.addEventListener(events[deviceType].move, (e) => {
                let elementId = document.elementFromPoint(
                    !isTouchDevice() ? e.clientX : e.touches[0].clientX,
                    !isTouchDevice() ? e.clientY : e.touches[0].clientY,
                ).id;
                checker(elementId);
            });
            col.addEventListener(events[deviceType].up, () => {
                draw = false;
            });
            div.appendChild(col);
        }
        container.appendChild(div);
    }
});
function checker(elementId) {
    let gridColumns = document.querySelectorAll(".gridCol");
    gridColumns.forEach((element) => {
        if (elementId == element.id) {
            if (draw && !erase) {
                element.style.backgroundColor = colorButton.value;
            } else if (draw && erase) {
                element.style.backgroundColor = "transparent";
            }
        }
    });
}
clearGridButton.addEventListener("click", () => {
    container.innerHTML = "";
});
eraseBtn.addEventListener("click", () => {
    erase = true;
});
paintBtn.addEventListener("click", () => {
    erase = false;
});
gridWidth.addEventListener("input", () => {
    widthValue.innerHTML = gridWidth.value < 9 ? `0${gridWidth.value}` : gridWidth.value;
});
gridHeight.addEventListener("input", () => {
    heightValue.innerHTML = gridHeight.value < 9 ? `0${gridHeight.value}` : gridHeight.value;
});
window.onload = () => {
    gridHeight.value = 0;
    gridWidth.value = 0;
};
That’s all after pasting the code your code will be successfully run. If you get any kind of error/problem in the code just comment or contact me on social media
Output Result
| Written By | @narendra-chand |
| Code By | Coding thai |