Hello, learner today In this blog post, We will be creating a QR Code Generator using HTML, CSS, and JS. In the past post, we have created many projects one of them is the Pixel Art Generator. Without wasting time Now it is time to create a QR Code Generator.
QR codes are Responsible for storing lots of data, and users can easily access the information by scanning the QR code. In our QR Code Generator, users can enter a text or URL to generate a QR code for it. You can download the QR code you generate. You can share it from the same page where you generate the QR code.
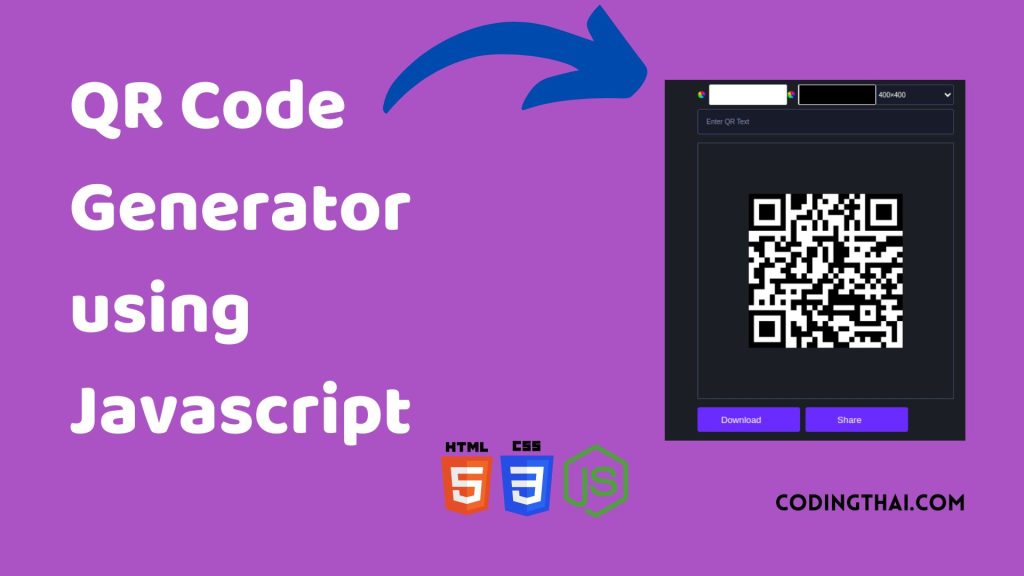
As you see in the above image at the top there is two color weel you can change the color of the QR code that you have generated. In the second you can see the” Enter QR text ” You have to paste the URL of the text you want to generate. After that your QR code is ready to scan and download
If you’re having difficulty understanding what I’m saying or what this QR code generator You can ask me in the comment.
| Code By | Coding thai |
| Language Used | HTML, CSS and JS |
| Responsive | Yes |
| External Link / Dependencies | No |
There are 3 types of styles to connect CSS with HTML files. Inline CSS, Internal CSS, External CSS. For Inline CSS in this, we have to write the CSS code inside the HTML code using style Attribute elements. For internal CSS we have to use the Style tag in the Head section on HTML File. We have used this Internal CSS in The below section. Last is External CSS for this we have to create another CSS File in the same folder this
Preview of QR Code Generator
In this preview, we have used internal CSS in the code. In the internal CSS, we have to write the code in the head section using the Style tag. We have to write the code in <Style> CSS code </style> in the Head section in the HTML file. This code is run in Codepen.io
See the Pen Qr Code Generator using Javascript by Coding thai (@Codingthai) on CodePen.
You might like this
- Download Button Animation
- Glassmorph Calculator using HTML, CSS, and JS
- Animated Skills Bar using HTML and CSS
- Glowing Login Form using HTML and CSS
- Sneakers Product Card using HTML and CSS
QR Code Generator using HTML, CSS, and JS [Source code]
For Creating A QR Code Generator using HTML, CSS, and JS. First, you have to create Three files (HTML, CSS, and JS) files with the named index.html, style.css, and Script.js in the same folder and you have to link the CSS and JS files to HTML. after that paste the below code, the HTML code in index.html, and paste the CSS code in style.css Again paste the Js code in script.js that’s all after pasting the code.
First, you have to create an HTML file with the named index.html paste the below HTML code on it, and save it. Remember to give a .html extension to the HTML file.
<!DOCTYPE html>
<html lang="en">
<head>
    <meta charset="UTF-8">
    <meta http-equiv="X-UA-Compatible" content="IE=edge">
    <meta name="viewport" content="width=device-width, initial-scale=1.0">
    <link rel="stylesheet" href="style.css">
    <title>#4 - Qr Code Generator | </title>
</head>
<body>
    <section>
        <div class="row">
            <input type="color" class="light" value="#ffffff">
            <input type="color" class="dark">
            <select class="sizes">
                <option value="100">100×100</option>
                <option value="200">200×200</option>
                <option value="300">300×300</option>
                <option selected value="400">400×400</option>
                <option value="500">500×500</option>
                <option value="600">600×600</option>
                <option value="700">700×700</option>
                <option value="800">800×800</option>
                <option value="900">900×900</option>
                <option value="1000">1000×1000</option>
            </select>
        </div>
        <input type="text" class="qr-text" placeholder="Enter QR Text">
        <div id="qr-code"></div>
        <div class="action-container">
            <a href="#" class="download btn" download="QRCode">
                <span>Download</span>
                <img src="download.svg" alt="">
            </a>
            <button class="btn share-btn">
                <span>Share</span>
                <img src="share.svg" alt="">
            </button>
        </div>
    </section>
    <script src="https://cdnjs.cloudflare.com/ajax/libs/qrcodejs/1.0.0/qrcode.min.js"></script>
    <script src="index.js"></script>
</body>
</html>
After pasting the HTML code, Now have to create a second CSS file with the named style.css. Paste the below code on it and save it. Again remember to give a .css extension to the CSS file.
*{
    box-sizing: border-box;
}
body{
    background: #1c1e26;
    font-family: sans-serif;
    max-width: 500px;
    height: 100vh;
    margin: 0 auto;
    display: flex;
    align-items: center;
    justify-content: center;
    color: #fff;
}
input[type="color"]{
    border: none;
    width: 32.5%;
    height: 40px;
    border-radius: 3px;
}
input[type="color"]::-webkit-color-swatch-wrapper{
    padding: 0;
}
input[type="color"]::-webkit-color-swatch{
    border: none;
}
a{
    text-decoration: none;
}
.qr-text{
    padding: 1rem;
    display: block;
    background: #181b29;
    border: 1px solid #414866;
    border-radius: 4px;
    width: 100%;
    margin: 0.5rem 0 1rem 0;
    color: #fff;
    outline: none;
}
.qr-text::placeholder{
    color: #8b92b7;
    font-weight: 500;
}
#qr-code{
    height: 500px;
    width: 500px;
    display: flex;
    align-items: center;
    justify-content: center;
    border: 1px solid #414866;
}

#qr-code img, #qr-code canvas{
    max-width: 100% !important;
    max-height: 100% !important;
}
.row{
    display: flex;
    align-items: center;
    justify-content: space-between;
}
.sizes{
    width: 32.5%;
    height: 40px;
    color: #fff;
    background: #181b29;
    border: 1px solid #414866;
    border-radius: 4px;
    outline: none;
}
.btn{
    color: #fff;
    max-width: 200px;
    padding: 14px;
    background: rgb(106, 43, 255);
    border-radius: 4px;
    border: none;
    display: flex;
    align-items: center;
    justify-content: center;
    cursor: pointer;
    font-size: 1.1rem;
    font-weight: 500;
    flex: 1;
}
.btn img{
    width: 20px;
    margin-left: 10px;
}
.share-btn{
    margin-left: 0.7rem;
}
.action-container{
    display: flex;
    margin: 1rem 0;
}
@media (max-width: 512px){
    body{
        max-width: 100%;
        padding: 10px;
    }
    #qr-code{
        width: 95vw;
        height: 95vw;
    }
    #qr-code img, #qr-code canvas{
        max-width: 95vw !important;
        max-height: 95vw !important;
    }
    .btn{
        min-width: unset;
    }
}
@media (max-width: 350px){
    .action-container{
        flex-direction: column;
    }
    .share-btn{
        margin-left: 0;
        margin-top: 0.7rem;
    }
}
After pasting the HTML and CSS code, Now have to create a third Javascript file with the named script.js. Paste the below code on it and save it. Again remember to give a .js extension to the javascript file.
const download = document.querySelector(".download");
const dark = document.querySelector(".dark");
const light = document.querySelector(".light");
const qrContainer = document.querySelector("#qr-code");
const qrText = document.querySelector(".qr-text");
const shareBtn = document.querySelector(".share-btn");
const sizes = document.querySelector(".sizes");
dark.addEventListener("input", handleDarkColor);
light.addEventListener("input", handleLightColor);
qrText.addEventListener("input", handleQRText);
sizes.addEventListener("change", handleSize);
shareBtn.addEventListener("click", handleShare);
let colorLight = "#fff",
    colorDark = "#000",
    text = defaultUrl,
    size = 300;

function handleDarkColor(e) {
    colorDark = e.target.value;
    generateQRCode();
}

function handleLightColor(e) {
    colorLight = e.target.value;
    generateQRCode();
}

function handleQRText(e) {
    const value = e.target.value;
    text = value;
    if (!value) {
        text = defaultUrl;
    }
    generateQRCode();
}

async function generateQRCode() {
    qrContainer.innerHTML = "";
    new QRCode("qr-code", {
        text,
        height: size,
        width: size,
        colorLight,
        colorDark,
    });
    download.href = await resolveDataUrl();
}

async function handleShare() {
    setTimeout(async () => {
        try {
            const base64url = await resolveDataUrl();
            const blob = await (await fetch(base64url)).blob();
            const file = new File([blob], "QRCode.png", {
                type: blob.type,
            });
            await navigator.share({
                files: [file],
                title: text,
            });
        } catch (error) {
            alert("Your browser doesn't support sharing.");
        }
    }, 100);
}

function handleSize(e) {
    size = e.target.value;
    generateQRCode();
}

function resolveDataUrl() {
    return new Promise((resolve, reject) => {
        setTimeout(() => {
            const img = document.querySelector("#qr-code img");
            if (img.currentSrc) {
                resolve(img.currentSrc);
                return;
            }
            const canvas = document.querySelector("canvas");
            resolve(canvas.toDataURL());
        }, 50);
    });
}
generateQRCode();
That’s all after pasting the code your code will be successfully run. If you get any kind of error/problem in the code just comment or contact me on social media
| Written By | @narendra-chand |
| Code By | Coding thai |