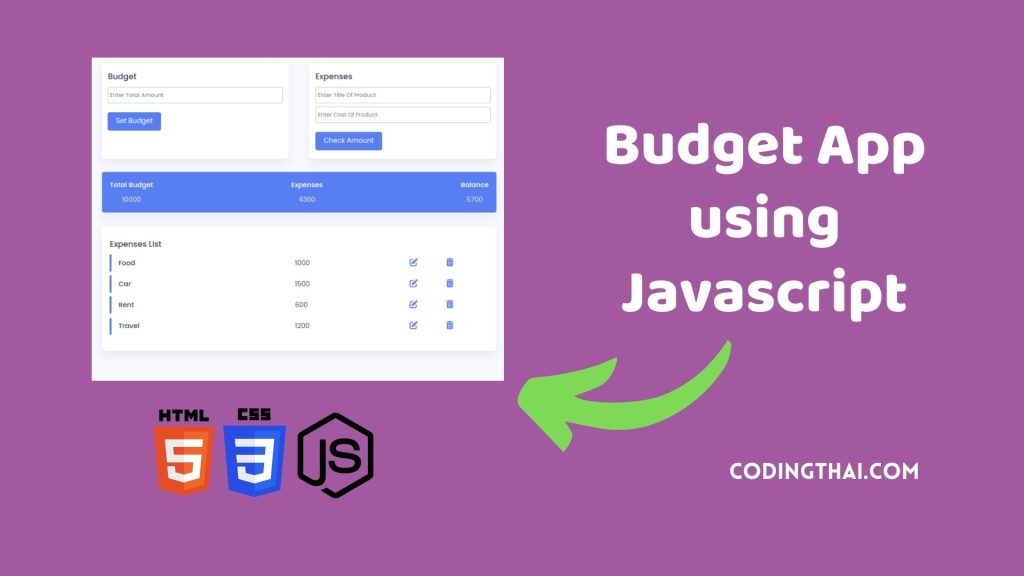
Hello, learner today In this blog post, We will be creating a Budget App using Javascript. In the past post, we have created many projects one of them is Snake Game using Javascript. Without wasting time Now it is time to create a Budget App.
Imagine a budget app as your digital money Calculator, helping both individuals and businesses handle their finances smoothly. This app lets you keep tabs on your earnings and spending, and sort your expenses into categories. It’s like having a visual assistant, using charts to display where your money is going and offering insights into your spending habits. With an easy-to-use design, including mobile access, budget apps make managing your money a breeze, keeping you in the know and helping you make wise financial choices.
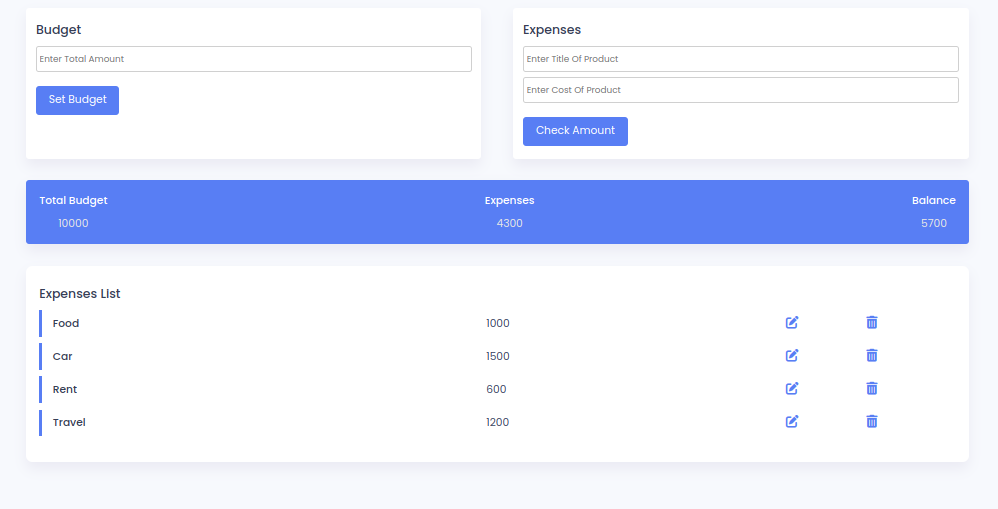
As you see in the above image the output of the budget app Let’s break down how it works. Our budget app has two input sections. We use the first input section to set the budget. And we use the other input to enter the expense title and expense amount. After the user sets the budget or adds an expense, we display an output that shows the budget, total expenses, and the balance left.
If you’re having difficulty understanding what I’m saying or what this Snake Game uses javascript then You can ask me in the comment.
| Code By | Coding thai |
| Language Used | HTML, CSS and JS |
| Responsive | Yes |
| External Link / Dependencies | No |
There are 3 types of styles to connect CSS with HTML files. Inline CSS, Internal CSS, External CSS. For Inline CSS in this, we have to write the CSS code inside the HTML code using style Attribute elements. For internal CSS we have to use the Style tag in the Head section on HTML File. We have used this Internal CSS in The below section. Last is External CSS for this we have to create another CSS File in the same folder this
Preview of Budget App
In this preview, we have used internal CSS in the code. In the internal CSS, we have to write the code in the head section using the Style tag. We have to write the code in <Style> CSS code </style> in the Head sectHTML and CSS Projection in the HTML file. This code is run in Codepen.io
See the Pen Web Budget app using HTML , CSS and Javascript by Coding thai (@Codingthai) on CodePen.
You might like this
Budget App using javaScript [Source code]
For Creating A Budget App using HTML, CSS, and JS. First, you have to create Three files (HTML, CSS, and JS) files with the named index.html, style.css, and Script.js in the same folder and you have to link the CSS and JS files to HTML. after that paste the below code, the HTML code in index.html, and paste the CSS code in style.css Again paste the Js code in script.js that’s all after pasting the code.
First, you have to create an HTML file with the named index.html paste the below HTML code on it, and save it. Remember to give a .html extension to the HTML file.
<!DOCTYPE html>
<html lang="en">
<head>
    <meta charset="UTF-8">
    <meta http-equiv="X-UA-Compatible" content="IE=edge">
    <meta name="viewport" content="width=device-width, initial-scale=1.0">
    <link rel="stylesheet" href="https://cdnjs.cloudflare.com/ajax/libs/font-awesome/6.3.0/css/all.min.css">
    <link rel="stylesheet" href="style.css">
    <title> Web Budget App | Codingthai</title>
</head>
<body>
    <div class="wrapper">
        <div class="container">
            <div class="sub-container">
                <div class="total-amount-container">
                    <h3>Budget</h3>
                    <p class="hide error" id="budget-error">
                        Value cannot be empty or negative
                    </p>
                    <input type="number" id="total-amount" placeholder="Enter Total Amount">
                    <button class="submit" id="total-amount-button">
                        Set Budget
                    </button>
                </div>
                <div class="user-amount-container">
                    <h3>Expenses</h3>
                    <p class="hide error" id="product-title-error">
                        Values cannot be empty
                    </p>
                    <input type="text" class="product-title" id="product-title" placeholder="Enter Title Of Product">
                    <input type="number" id="user-amount" placeholder="Enter Cost Of Product">
                    <button class="submit" id="check-amount">Check Amount</button>
                </div>
            </div>
            <div class="output-container flex-space">
                <div>
                    <p>Total Budget</p>
                    <span id="amount">
                        0
                    </span>
                </div>
                <div>
                    <p>Expenses</p>
                    <span id="expenditure-value">
                        0
                    </span>
                </div>
                <div>
                    <p>Balance</p>
                    <span id="balance-amount">
                        0
                    </span>
                </div>
            </div>
        </div>
        <div class="list">
            <h3>Expenses List</h3>
            <div class="list-container" id="list"></div>
        </div>
    </div>
    <script src="index.js"></script>
</body>
</html>
After pasting the HTML code, Now have to create a second CSS file with the named style.css. Paste the below code on it and save it. Again remember to give a .css extension to the CSS file.
@import url('https://fonts.googleapis.com/css2?family=Poppins:wght@300;400;500;600;700&display=swap');

*{
    padding: 0;
    margin: 0;
    box-sizing: border-box;
    font-family: 'Poppins', sans-serif;
}

body{
    background-color: #f7f9fd;
}

.wrapper {
    width: 90%;
    font-size: 16px;
    max-width: 43.753m;
    margin: 1em auto;
}

.container{
    width: 100%;
}

.sub-container{
    width: 100%;
    display: grid;
    grid-template-columns: 1fr 1fr;
    gap: 3em;
}

.flex{
    display: flex;
    align-items: center;
}

.flex-space{
    display: flex;
    justify-content: space-between;
    align-items: center;
}

.wrapper h3{
    color: #363d55;
    font-weight: 500;
    margin-bottom: 0.6em;
}

.container input{
    display: block;
    width: 100%;
    padding: 0.6em 0.3em;
    border: 1px solid #d0d0d0;
    border-radius: 0.3em;
    color: #414a67;
    outline: none;
    font-weight: 400;
    margin-bottom: 0.6em;
}

.container input:focus{
    border-color: #587ef4;
}

.total-amount-container, .user-amount-container{
    background: #fff;
    padding: 1.25em 0.9em;
    border-radius: 0.3em;
    box-shadow: 0 0.6em 1.2em rgba(28, 0, 80, 0.06);
}

.output-container{
    background-color: #587ef4;
    color: #fff;
    border-radius: 0.3em;
    box-shadow: 0 0.6em 1.2em rgba(28, 0, 80, 0.06);
    margin: 2em 0;
    padding: 1.2em;
}

.output-container p{
    font-weight: 500;
    margin-bottom: 0.6em;
}

.output-container span{
    display: block;
    text-align: center;
    font-weight: 400;
    color: #e5e5e5;
}

.submit{
    font-size: 1em;
    margin-top: 0.8em;
    background-color: #587ef4;
    border: none;
    outline: none;
    color: #fff;
    padding: 0.6em 1.2em;
    border-radius: 0.3em;
    cursor: pointer;
}

.list{
    background-color: #fff;
    padding: 1.8em 1.2em;
    box-shadow: 0 0.6em 1.2em rgba(28, 0, 80, 0.06);
    border-radius: 0.6em;
}

.sublist-content{
    width: 100%;
    border-left: 0.3em solid #587ef4;
    margin-bottom: 0.6em;
    padding: 0.5em 1em;
    display: grid;
    grid-template-columns: 3fr 2fr 1fr 1fr;
}

.product{
    font-weight: 500;
    color: #363d55;
}

.amount{
    color: #414a67;
    margin-left: 20%;
}

.icons-container{
    width: 5em;
    margin: 1.2em;
    align-items: center;
}

.product-title{
    margin-bottom: 1em;
}

.hide{
    display: none;
}

.error{
    color: #ff465a;
}

.edit{
    margin-left: auto;
}

.edit, .delete{
    background: transparent;
    cursor: pointer;
    margin-right: 1.5em;
    border: none;
    color: #587ef4;
}

@media screen and (max-width: 600px) {
    .wrapper{
        font-size: 14px;
    }

    .sub-container{
        grid-template-columns: 1fr;
        gap: 1em;
    }
}
After pasting the HTML and CSS code, Now have to create a third Javascript file with the named script.js. Paste the below code on it and save it. Again remember to give a .js extension to the javascript file.
let totalAmount = document.getElementById("total-amount");
let userAmount = document.getElementById("user-amount");
const checkAmountButton = document.getElementById("check-amount");
const totalAmountButton = document.getElementById("total-amount-button");
const productTitle = document.getElementById("product-title");
const errorMessage = document.getElementById("budget-error");
const productTitleError = document.getElementById("product-title-error");
const productCostError = document.getElementById("product-cost-error");
const amount = document.getElementById("amount");
const expenditureValue = document.getElementById("expenditure-value");
const balanceValue = document.getElementById("balance-amount");
const list = document.getElementById("list");
let tempAmount = 0;
// Set Budget Functions
totalAmountButton.addEventListener("click", () => {
    tempAmount = totalAmount.value;
    // Bad input
    if (tempAmount === "" || tempAmount < 0) {
        errorMessage.classList.remove("hide");
    } else {
        errorMessage.classList.add("hide");
        // Set bidget
        amount.innerHTML = tempAmount;
        balanceValue.innerText = tempAmount - expenditureValue.innerText;
        // Clear input
        totalAmount.value = "";
    }
});
// Disable edit and delete button function
const disableButtons = (bool) => {
    let editButtons = document.getElementsByClassName("edit");
    Array.from(editButtons).forEach((element) => {
        element.disabled = bool;
    });
};
// Modify list elements function
const modifyElement = (element, edit = false) => {
    let parentDiv = element.parentElement;
    let currentBalance = balanceValue.innerText;
    let currentExpense = expenditureValue.innerText;
    let parentAmount = parentDiv.querySelector(".amount").innerText;
    if (edit) {
        let parentText = parentDiv.querySelector(".product").innerText;
        productTitle.value = parentText;
        userAmount.value = parentAmount;
        disableButtons(true);
    }
    balanceValue.innerText = parseInt(currentBalance) + parseInt(parentAmount);
    expenditureValue.innerText = parseInt(currentExpense) - parseInt(parentAmount);
    parentDiv.remove();
};
// Create list function
const listCreator = (expenseName, expenseValue) => {
    let subListContent = document.createElement("div");
    subListContent.classList.add("sublist-content", "flex-space");
    list.appendChild(subListContent);
    subListContent.innerHTML = `<p class="product">${expenseName}</p><p class="amount">${expenseValue}</p>`;
    let editButton = document.createElement("button");
    editButton.classList.add("fa-solid", "fa-pen-to-square", "edit");
    editButton.style.fontSize = "1.2em";
    editButton.addEventListener("click", () => {
        modifyElement(editButton, true);
    });
    let deleteButton = document.createElement("button");
    deleteButton.classList.add("fa-solid", "fa-trash-can", "delete");
    deleteButton.style.fontSize = "1.2em";
    deleteButton.addEventListener("click", () => {
        modifyElement(deleteButton);
    });
    subListContent.appendChild(editButton);
    subListContent.appendChild(deleteButton);
    document.getElementById("list").appendChild(subListContent);
};
// Add expenses function
checkAmountButton.addEventListener("click", () => {
    // Check empty
    if (!userAmount.value || !productTitle.value) {
        productTitleError.classList.remove("hide");
        return false;
    }
    // Enable buttons
    disableButtons(false);
    //Expense
    let expenditure = parseInt(userAmount.value);
    // Total expense (existing + new)
    let sum = parseInt(expenditureValue.innerText) + expenditure;
    expenditureValue.innerText = sum;
    // Total balance = budget - total expense
    const totalBalance = tempAmount - sum;
    balanceValue.innerText = totalBalance;
    //Create list
    listCreator(productTitle.value, userAmount.value);
    //Clear inputs
    productTitle.value = "";
    userAmount.value = "";
});
That’s all after pasting the code your code will be successfully run. If you get any kind of error/problem in the code just comment or contact me on social media
Output Result
| Written By | @narendra-chand |
| Code By | Coding thai |
| Code idea | @Codewithmaya |