Hello, learner today In this blog post, We will be creating a Snake Login Form using HTML, CSS, and JS. In the past post, we have created many projects one of them is the Dynamic Stopwatch. Without wasting time Now it is time to Login Form.

Creating a login Form is an essential step for any website or application that requires user authentication. It allows users to securely log in and access their personal information on the website or application.
This article will help you create a professional-looking login page that is easy to navigate and use. You will see how to write the HTML and CSS code for a snake login form with a username and password.
At first, we have to create 2 div tags for the login form one is for the page and another is for the form. Again create a 2 div tag inside the form div one is for the login title and description and another is for the actual Login form. between the form and login title create a div for the snake design that’s all in the HTML section
Now in the CSS section, we style the stopwatch and align the elements using CSS styling properties.
In the Javascript section, animate the snake form login to password and password to summit button that’s all.
| Code By | Mikael Ainalem |
| Language Used | HTML And CSS |
| Responsive | Yes |
| External Link / Dependencies | No |
There are 3 types of styles to connect CSS with HTML files. Inline CSS, Internal CSS, External CSS. For Inline CSS in this, we have to write the CSS code inside the HTML code using style Attribute elements. For internal CSS we have to use the Style tag in the Head section on HTML File. We have used this Internal CSS in The below section. Last is External CSS for this we have to create another CSS File in the same folder this
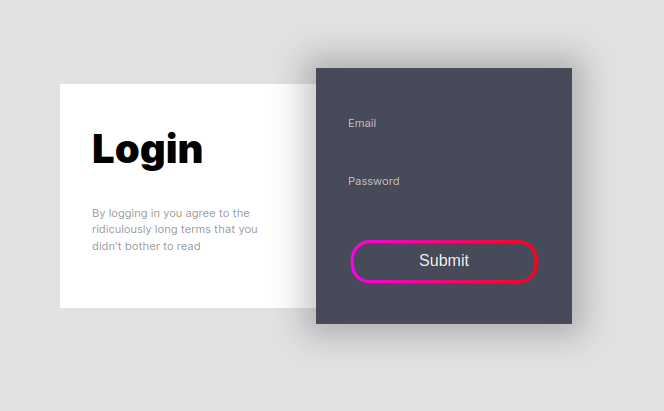
Preview of Snake Login Form
In this preview, we have used internal CSS in the code. In the internal CSS, we have to write the code in the head section using the Style tag. We have to write the code in <Style> CSS code </style> in the Head section in the HTML file. This code is run in Codepen.io
See the Pen Snake highlight by Mikael Ainalem (@ainalem) on CodePen.
You might like this
- Sneakers Product Card using HTML and CSS
- Square Navigation Bar Using HTML5 And CSS3
- Liquid Loading Effect Using HTML5 And CSS3
- Social Share Button Using HTML5 And CSS3
- Wacy Hover Button Using HTML5 And CSS3
Snake Login Form using HTML, CSS, and JS [Source code]
For Creating A Snake Login Form using HTML, CSS, and JS. First, you have to create three files (HTML, CSS, and Javascript) files with the named index.html, style.css, and script.js in the same folder and you have to link the CSS and Javascript files to HTML. after that paste the below code, the HTML code in index.html, and paste the CSS code in style.css lastly paste the Javascript code in script.js that’s all after pasting the code.
First, you have to create an HTML file with the named index.html and paste the below HTML code on it and save it. Remember to give a .html extension to the HTML file.
<!DOCTYPE html>
<html lang="en" >
<head>
  <meta charset="UTF-8">
  <title>Snake Login Form Codingthai</title>
  <link rel="stylesheet" href="./style.css">

</head>
<body>
<div class="page">
  <div class="container">
    <div class="left">
      <div class="login">Login</div>
      <div class="eula">By logging in you agree to the ridiculously long terms that you didn't bother to read</div>
    </div>
    <div class="right">
      <svg viewBox="0 0 320 300">
        <defs>
          <linearGradient
                          inkscape:collect="always"
                          id="linearGradient"
                          x1="13"
                          y1="193.49992"
                          x2="307"
                          y2="193.49992"
                          gradientUnits="userSpaceOnUse">
            <stop
                  style="stop-color:#ff00ff;"
                  offset="0"
                  id="stop876" />
            <stop
                  style="stop-color:#ff0000;"
                  offset="1"
                  id="stop878" />
          </linearGradient>
        </defs>
        <path d="m 40,120.00016 239.99984,-3.2e-4 c 0,0 24.99263,0.79932 25.00016,35.00016 0.008,34.20084 -25.00016,35 -25.00016,35 h -239.99984 c 0,-0.0205 -25,4.01348 -25,38.5 0,34.48652 25,38.5 25,38.5 h 215 c 0,0 20,-0.99604 20,-25 0,-24.00396 -20,-25 -20,-25 h -190 c 0,0 -20,1.71033 -20,25 0,24.00396 20,25 20,25 h 168.57143" />
      </svg>
      <div class="form">
        <label for="email">Email</label>
        <input type="email" id="email">
        <label for="password">Password</label>
        <input type="password" id="password">
        <input type="submit" id="submit" value="Submit">
      </div>
    </div>
  </div>
</div>


</body>
</html>
After pasting the HTML code, Now have to create a second CSS file with the named style.css. Paste the below code on it and save it. Again remember to give a .css extension to the CSS file.
@import url('https://rsms.me/inter/inter-ui.css');
::selection {
  background: #2D2F36;
}
::-webkit-selection {
  background: #2D2F36;
}
::-moz-selection {
  background: #2D2F36;
}
body {
  background: white;
  font-family: 'Inter UI', sans-serif;
  margin: 0;
  padding: 20px;
}
.page {
  background: #e2e2e5;
  display: flex;
  flex-direction: column;
  height: calc(100% - 40px);
  position: absolute;
  place-content: center;
  width: calc(100% - 40px);
}
@media (max-width: 767px) {
  .page {
    height: auto;
    margin-bottom: 20px;
    padding-bottom: 20px;
  }
}
.container {
  display: flex;
  height: 320px;
  margin: 0 auto;
  width: 640px;
}
@media (max-width: 767px) {
  .container {
    flex-direction: column;
    height: 630px;
    width: 320px;
  }
}
.left {
  background: white;
  height: calc(100% - 40px);
  top: 20px;
  position: relative;
  width: 50%;
}
@media (max-width: 767px) {
  .left {
    height: 100%;
    left: 20px;
    width: calc(100% - 40px);
    max-height: 270px;
  }
}
.login {
  font-size: 50px;
  font-weight: 900;
  margin: 50px 40px 40px;
}
.eula {
  color: #999;
  font-size: 14px;
  line-height: 1.5;
  margin: 40px;
}
.right {
  background: #474A59;
  box-shadow: 0px 0px 40px 16px rgba(0,0,0,0.22);
  color: #F1F1F2;
  position: relative;
  width: 50%;
}
@media (max-width: 767px) {
  .right {
    flex-shrink: 0;
    height: 100%;
    width: 100%;
    max-height: 350px;
  }
}
svg {
  position: absolute;
  width: 320px;
}
path {
  fill: none;
  stroke: url(#linearGradient);;
  stroke-width: 4;
  stroke-dasharray: 240 1386;
}
.form {
  margin: 40px;
  position: absolute;
}
label {
  color:  #c2c2c5;
  display: block;
  font-size: 14px;
  height: 16px;
  margin-top: 20px;
  margin-bottom: 5px;
}
input {
  background: transparent;
  border: 0;
  color: #f2f2f2;
  font-size: 20px;
  height: 30px;
  line-height: 30px;
  outline: none !important;
  width: 100%;
}
input::-moz-focus-inner {
  border: 0;
}
#submit {
  color: #707075;
  margin-top: 40px;
  transition: color 300ms;
}
#submit:focus {
  color: #f2f2f2;
}
#submit:active {
  color: #d0d0d2;
}
After pasting the HTML and CSS code, Now have to create a third Javascript file with the named script.js. Paste the below code on it and save it. Again remember to give a .js extension to the javascript file.
var current = null;
document.querySelector('#email').addEventListener('focus', function(e) {
  if (current) current.pause();
  current = anime({
    targets: 'path',
    strokeDashoffset: {
      value: 0,
      duration: 700,
      easing: 'easeOutQuart'
    },
    strokeDasharray: {
      value: '240 1386',
      duration: 700,
      easing: 'easeOutQuart'
    }
  });
});
document.querySelector('#password').addEventListener('focus', function(e) {
  if (current) current.pause();
  current = anime({
    targets: 'path',
    strokeDashoffset: {
      value: -336,
      duration: 700,
      easing: 'easeOutQuart'
    },
    strokeDasharray: {
      value: '240 1386',
      duration: 700,
      easing: 'easeOutQuart'
    }
  });
});
document.querySelector('#submit').addEventListener('focus', function(e) {
  if (current) current.pause();
  current = anime({
    targets: 'path',
    strokeDashoffset: {
      value: -730,
      duration: 700,
      easing: 'easeOutQuart'
    },
    strokeDasharray: {
      value: '530 1386',
      duration: 700,
      easing: 'easeOutQuart'
    }
  });
});
That’s all after pasting the code your code will be successfully run. If you get any kind of error/problem in the code just comment or contact me on social media
Output Result
Conclusion
After creating this snake login form you will able to learn how to create a login form easily. from this project you will learn about different properties of CSS.
| Written By | @narendra-chand |
| Code By | Mikael Ainalem |